ios
Frida Gadget on a stock iPhoneTest device you own.
No jailbreak needed: embed the Frida Gadget library in your own app, sign it with your Apple Account, install it on any iPhone, and check that hooking detection fires.
Scope & safety · October 2026
This covers instrumenting your own app on a device you own, to test this library's hooking detection. The phone is not modified at all — only your app's bundle changes, and deleting the app removes everything. Never ship a build that contains the gadget, and only re-sign apps you have the right to modify (your own builds). App Store downloads are encrypted and cannot be re-signed this way anyway.
00
How this works
Frida is a toolkit that lets you inspect and change a running app ("hooking"). On a jailbroken phone it runs as a system service. On a normal, stock iPhone it cannot get into other apps — but it can ship inside an app as a library called Frida Gadget (FridaGadget.dylib). When the app launches, iOS loads the gadget like any other library, and Frida is now running in that app's process.
That is exactly what an attacker does with a repackaged app, which is why it is a good test. This library's hooking_libraries check walks the list of libraries loaded into the process and flags any whose name contains frida. So as soon as the gadget is embedded, the check should fire — you do not even need to connect Frida to see it.
Works on any iPhone and any iOS version that Xcode can deploy to, including the newest hardware that has no jailbreak (e.g. an iPhone XS Max on iOS 18.7.10, or an iPhone 17).
01
What you need
- 01A Mac with Xcode (free from the Mac App Store). Open it once so it installs its extra components.
- 02An Apple Account. Your normal Apple ID works — no paid membership needed. See the next section for what "free" means.
- 03The app's source code, or this library's example app (
example/in the react-native-device-integrity repo). - 04A USB cable for the iPhone, and the phone unlocked.
- 05Optional — only to actually attach Frida: Python 3 and
pip install frida-toolson the Mac.
02
Free vs paid Apple Account
To run an app you built on a real iPhone, Apple requires it to be signed with a certificate tied to an Apple Account. You do not need to pay for that. When you sign in to Xcode with any Apple ID, Xcode creates a Personal Team for you (shown as "Your Name (Personal Team)") and can sign apps for your own devices for free. That is what this guide means by a free account.
The paid Apple Developer Program (99 USD per year) is only needed to publish to the App Store or TestFlight, or to get longer-lived signatures and all capabilities. For this test, free is enough.
What changes between free and paid
- App lifetime
- Free: the signature expires after 7 days — the app then refuses to open until you build and install it again. Paid: 1 year.
- Apps per device
- Free: at most 3 of your own sideloaded/Xcode apps installed at once per device. Paid: no practical limit.
- New app IDs
- Free: at most 10 new bundle IDs per 7 days. Each distinct bundle ID you build counts.
- Bundle ID
- Free: must be globally unique — a bundle ID like
deviceintegrity.examplemay already be taken, so add your own prefix (e.g.com.yourname.deviceintegrity.example). - Capabilities
- Free: Push Notifications, App Groups, iCloud, Sign in with Apple and other entitlement-based features are removed. App Attest also relies on an entitlement, so expect attestation tests to need a paid team. The checks in this guide do not need any of them.
- Team ID
- Each team has its own 10-character Team ID. A Personal Team's ID differs from your company's, which matters for
tamper_team_id_mismatch(see "What to expect").
03
Step 1 — Add your Apple Account to Xcode
- 01Open Xcode → Settings… (⌘,) → Accounts.
- 02Click + at the bottom left → Apple Account → sign in.
- 03Select the account: under Teams you should see Your Name (Personal Team). That is the free signing team.
- 04On the iPhone (iOS 16 and later), Developer Mode must be on before Xcode can run apps: connect the phone once, then Settings → Privacy & Security → Developer Mode → on → restart → tap Turn On. (The switch appears after the phone has been connected to Xcode.)
04
Shortcut — this library's example app
The example app ships an opt-in config plugin (example/plugins/with-frida-gadget.js) that does steps 4 and 5 for you at prebuild time: it links the gadget on device builds only, copies and signs it into Frameworks, adds a config so the app starts normally, and sets the Xcode scheme to Release with no debugger — so Run launches the app the way a user would, with no extra debugger_attached or hooking_dyld_insert signals and no long white screen. It is off unless FRIDA_GADGET=1 is set, so normal builds never contain it. If you are testing your own app instead, skip this and follow the steps below.
- 01Download the gadget (step 3) and save it as
example/frida/FridaGadget.dylibin the library repo. That folder is gitignored. - 02From the repo root run
yarn example prebuild:frida. This regeneratesexample/ioswith the gadget wired in. - 03Open
example/ios/DeviceIntegrityExample.xcworkspace, set your Team (and a unique Bundle Identifier if it is a Personal Team), pick your iPhone, and press Run. (The plugin already set Release and turned off the debugger.) - 04The app opens on its own. Run the check: expect
hooking_librariesonly. - 05Back to a clean app:
yarn example prebuild:iosregenerates the project without the gadget.
05
Step 2 — Build the app once without the gadget
First prove the app installs and runs normally, so you have a clean baseline to compare against. For this library's example app, generate the native project and open it in Xcode:
- 01In Xcode's left sidebar, click the blue project icon → select the app target → Signing & Capabilities.
- 02Tick Automatically manage signing and choose Your Name (Personal Team) as the Team.
- 03If Xcode shows a bundle ID error, change Bundle Identifier to something unique, e.g.
com.yourname.deviceintegrity.example. - 04React Native only: build the Release configuration so the JavaScript is bundled into the app (a Debug build needs a running Metro server): Product → Scheme → Edit Scheme… → Run → Build Configuration → Release.
- 05Pick your iPhone in the device menu at the top of the window and press Run (▶).
- 06First install only: on the phone, Settings → General → VPN & Device Management → your Apple Account → Trust. Then open the app.
- 07Run the integrity check and note the result. On a stock iPhone it should be clean (no
hooking_libraries).
# from the library repo root
yarn install
yarn example expo prebuild --platform ios   # creates example/ios
open example/ios/DeviceIntegrityExample.xcworkspace
06
Step 3 — Download Frida Gadget
Download the iOS gadget from Frida's GitHub releases: the file is named frida-gadget-<version>-ios-universal.dylib.xz (17.20.0 at the time of writing). Use the plain ios-universal one, not ios-simulator-universal. Then unpack and rename it in Terminal:
cd ~/Downloads
unxz frida-gadget-17.20.0-ios-universal.dylib.xz
mv frida-gadget-17.20.0-ios-universal.dylib FridaGadget.dylib

# check it: arm64 + arm64e, and it expects to live in the app's Frameworks folder
file FridaGadget.dylib
otool -D FridaGadget.dylib    # prints @executable_path/Frameworks/FridaGadget.dylib
Note
The file is about 40 MB. Keep it out of git — it is a test tool, not part of your app.
07
Step 4 — Add a config so the app does not freeze
By default the gadget pauses the app at launch until a Frida client connects — the app sits on a blank screen. For a detection test you want it to start normally, so create a file named exactly FridaGadget.config next to the dylib with this content. The gadget still listens on the phone, so you can attach later if you want. Keep `"code_signing": "required"` — without it, a stock iPhone kills the app at launch whenever no debugger is attached (it crashes instantly with no logs).
{
  "interaction": {
    "type": "listen",
    "address": "127.0.0.1",
    "port": 27042,
    "on_load": "resume"
  },
  "code_signing": "required"
}
08
Step 5 — Embed the gadget in the app
- 01Drag FridaGadget.dylib and FridaGadget.config from Finder into Xcode's left sidebar (onto the app's folder). In the dialog, tick Copy items if needed and make sure your app target is ticked under "Add to targets". Click Finish.
- 02Select the target → Build Phases. Open Link Binary With Libraries and check that
FridaGadget.dylibis listed (Xcode usually adds it; if not, click + → Add Other… → pick it). - 03Still in Build Phases, click + (top left) → New Copy Files Phase. Set Destination to Frameworks, click + inside it, add
FridaGadget.dylib, and make sure Code Sign On Copy is ticked. - 04Open Copy Bundle Resources and check that
FridaGadget.configis listed. (The gadget looks for its config in the app folder, one level above Frameworks.) - 05Build Settings → search "Runpath Search Paths" → it should include
@executable_path/Frameworks(the default for iOS apps).
Note
Expo / React Native with Continuous Native Generation: example/ios is generated. Running expo prebuild --clean (or yarn example ios after a config change) recreates it and removes these changes, so redo this step after a regenerate. Never commit the gadget to your real app.
09
Step 6 — Install, then launch from the home screen
- 01Press Run (▶) in Xcode to build and install.
- 02When the app opens, press Stop (■) in Xcode. Running from Xcode attaches the debugger, which makes the library also report
debugger_attached— useful to know, but it muddies this test. - 03Open the app from the home screen instead. It should start normally (thanks to the config from step 4).
- 04Tip: to skip the debugger entirely, Product → Scheme → Edit Scheme… → Run → Info → untick Debug executable. Run then installs and launches the app without a debugger.
- 05Run the integrity check.
10
What to expect
Record device · iOS build · how it was signed · signals reported. Then remove the gadget (delete it from the Copy Files phase and Link Binary With Libraries), rebuild, and confirm hooking_libraries disappears — that proves it was the gadget and nothing else.
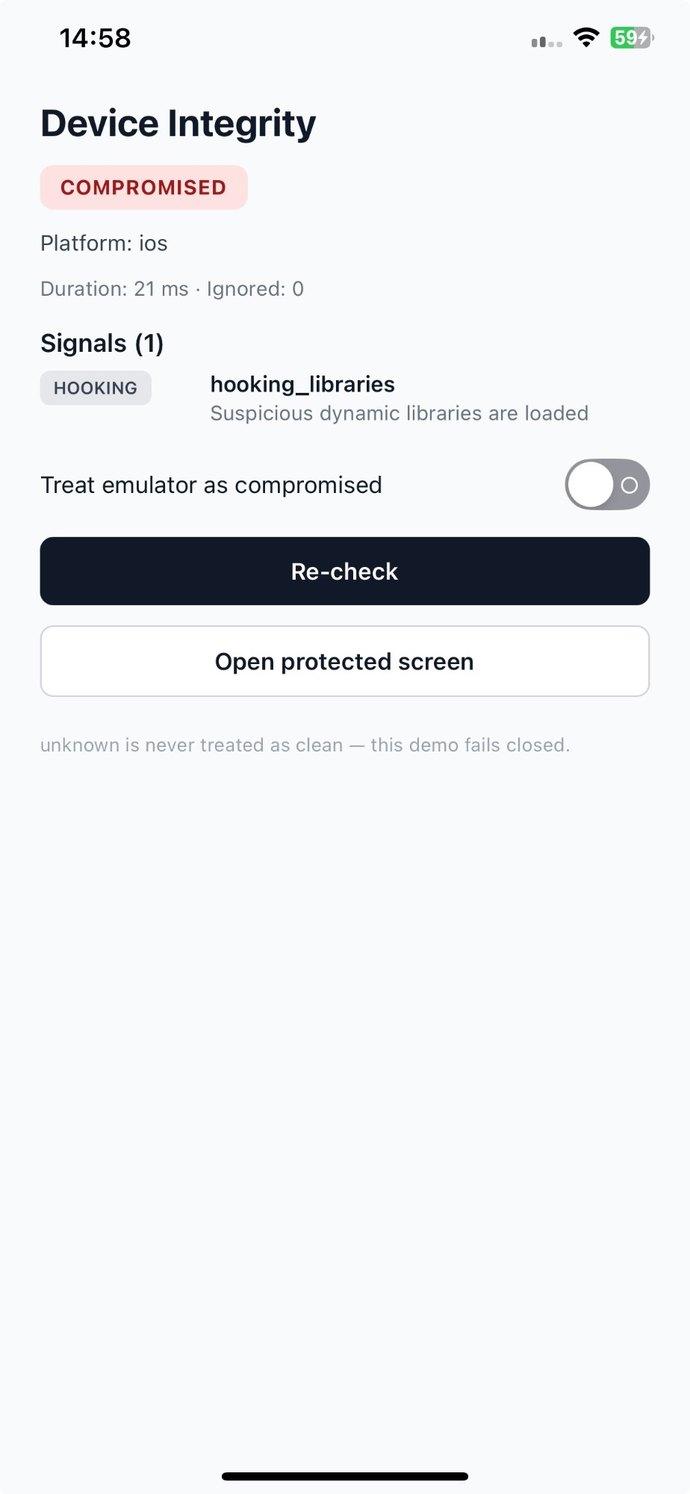
Signals
- hooking_libraries
- Expected. The gadget is a loaded library whose name contains
frida. This is the result scenario A05 is looking for. - debugger_attached
- Only if you launched from Xcode (debugger attached). Launch from the home screen to drop it.
- tamper_team_id_mismatch
- Only if your app passes
expectedTeamIds(e.g. your company's Team ID) and you signed with a different team, such as your Personal Team. That is the realistic attacker case: a repackaged app is always re-signed with someone else's team. - Jailbreak signals
- Not expected. The phone is stock. If any jailbreak signal appears, record it — it would be a false positive.
11
Optional — actually connect Frida
Detection does not need this, but it is worth seeing that the gadget is live. With the app open on the phone and the phone on USB, run the commands below. The process shows up with the name Gadget.
Install the same Frida version on the Mac as the gadget you embedded (e.g. pip install frida-tools frida==17.20.0); mismatched versions often refuse to connect.
On a stock iPhone, iOS blocks Frida from rewriting code unless the app was started with a debugger. So for full hooking, launch the app from Xcode once (the relaxed state stays after you stop), otherwise the "code_signing": "required" setting from step 4 applies: you can inspect the process (modules, memory, calling functions) but not intercept functions.
pip install frida-tools
frida-ps -U                 # should list: Gadget
frida -U Gadget             # opens a JavaScript prompt inside your app
# inside the prompt, for example:
#   Process.enumerateModules().map(m => m.name).filter(n => /frida/i.test(n))
12
Alternative — inject into an existing IPA with Impactor
If you have an .ipa of your own app but not the source (e.g. a build from CI), Impactor can add the gadget while it signs and installs. Caveat: Impactor also embeds ElleKit (a tweak loader) whenever you add a tweak, and this library flags ElleKit too. So hooking_libraries will fire, but you cannot tell from that alone whether it was Frida or ElleKit. Prefer the Xcode route above for a clean result.
- 01Only your own, unencrypted builds work. To turn an Xcode build into an IPA: find the
.app(Xcode → Product → Show Build Folder in Finder → Products → Release-iphoneos), make a folder namedPayload, put the.appinside, and zip the folder; rename the zip to.ipa. - 02Open Impactor, sign in with your Apple Account, and drag the
.ipain. - 03In the customization options, add
FridaGadget.dylibas a tweak (Impactor copies it to Frameworks and adds the load command). - 04Click Install, trust the profile on the phone, then open the app from the home screen.
# Same thing from the command line (Impactor's CLI)
plumesign sign --input MyApp.ipa --output MyApp-gadget.ipa --tweak FridaGadget.dylib
13
Troubleshooting
Common problems
- "Developer disk image could not be mounted"
- Look further down the error:
kAMDMobileImageMounterDeviceLockedmeans the phone was locked. Xcode copies its developer tools onto the phone before running an app, and iOS refuses while the screen is locked. Unlock the phone, keep it awake, tap Trust if asked, and press Run again. Also check the device menu at the top of Xcode — with several iPhones connected it is easy to run on the wrong one. - Crashes instantly on open, no logs
- Read the crash report: Xcode → Window → Devices and Simulators → your iPhone → Open Recent Logs, or
xcrun devicectl device copy from --device <id> --domain-type systemCrashLogs --source / --destination crashes. If it saysEXC_BREAKPOINT (SIGTRAP)with every frame in FridaGadget.dylib, the config is missing"code_signing": "required"(step 4). The gadget tried to patch code with no debugger attached, and iOS killed the app. - Crash on launch: Library not loaded
- The dylib is not inside the app. Check the Copy Files phase exists, its Destination is Frameworks, and FridaGadget.dylib is in it. Also check
otool -Dprints@executable_path/Frameworks/FridaGadget.dylib. - Crash: code signature invalid
- Tick Code Sign On Copy for FridaGadget.dylib in the Copy Files phase, then clean (⇧⌘K) and run again.
- White screen for ~20 s when run from Xcode
- The Xcode debugger is loading debug info for every library, and the gadget is about 40 MB. If the console shows
Frida: Listening on 127.0.0.1 TCP port 27042, the gadget is fine. Stop in Xcode and launch from the home screen, or untick Debug executable in the scheme. - App stuck on a blank screen
- The gadget is waiting for Frida. FridaGadget.config is missing from Copy Bundle Resources or misnamed — it must be exactly
FridaGadget.config. Or connect withfrida -U Gadgetonce. - "Failed to register bundle identifier"
- The bundle ID is taken. Change it to a unique one (e.g.
com.yourname.myapp). - "Maximum number of apps" / 10 App IDs
- Free-team limits: delete one of your other sideloaded apps from the phone, or wait for the 7-day window to pass. Reuse one bundle ID instead of creating new ones.
- App stopped opening after a week
- The free signature expired. Build and run from Xcode again.
- "Untrusted Developer" / Developer Mode
- Settings → General → VPN & Device Management → Trust; and Settings → Privacy & Security → Developer Mode on (iOS 16+).
- RN app shows a red screen / no bundle
- You built Debug without Metro running. Switch the scheme's Run configuration to Release.
- frida-ps -U does not show Gadget
- Keep the app open in the foreground and the phone unlocked on USB. Match the Frida version on the Mac to the gadget version.
- hooking_libraries does not fire
- The gadget did not load. In Xcode, Product → Show Build Folder → open the .app (Show Package Contents) → Frameworks should contain FridaGadget.dylib. If it is there but the signal is still missing, record it — that is a detection gap worth reporting.
Sources
Further reading.Check current coverage.
- Frida — Gadget documentationOpen ↗
https://frida.re/docs/gadget/
- Frida — iOS documentationOpen ↗
https://frida.re/docs/ios/
- Frida releases (gadget downloads)Open ↗
https://github.com/frida/frida/releases
- Impactor releases — claration/Impactor (GitHub)Open ↗
https://github.com/claration/impactor/releases/tag/v2.6.5
- Impactor — tweak injectionOpen ↗
https://mintlify.wiki/claration/Impactor/advanced/tweaks
- Apple — Personal Team cannot sign for App Store (QA1915)Open ↗
https://developer.apple.com/library/archive/qa/qa1915/_index.html
- Free provisioning limits (Microsoft Learn)Open ↗
https://learn.microsoft.com/en-us/previous-versions/xamarin/ios/get-started/installation/device-provisioning/free-provisioning
Related validation scenarios
What this lab unlocks.A01–A06 move from pending to validated.
Running the library on a device prepared with this guide turns the matching adversarial scenarios from pending into validated — once you observe and record the result.